This is my way of making Autotrax much easier to use, and also enabling me to use any windows printer to print the pcb layouts at the maximum printer resolution.
To use, first download, unzip and install the demo version of Protel for Windows from here, then download my GUI file and unzip it to a directory of your choice.
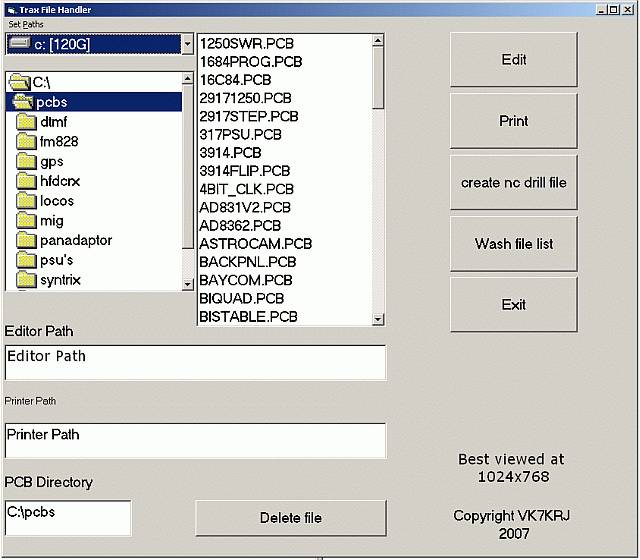
Trax does not need to be "installed", just put a shortcut to trax.exe on your desktop or the quick-launch task bar, the run it.
The first time Trax.exe is run, click on the "set paths" in the top lefthand corner, and use the browse button to navigate to the .exe file for Protel for Windows (usually c:\Advpcb) and the same for Autotrax, then navigate to where you keep your pcb files (you have to actually click on a pcb file, it doesn't matter which one). This is a one-time only setup, it will remember the paths from then on.
Most of the buttons are self-explanatory, the "wash file list" is there to get rid of all the rubbish PFW puts in when opening a file for printing. The "create NC drill file" will create an ordered list of drilling co-ordinates for the holes on the board. This was for a pcb drilling machine I built a few years ago, I left it in in case it is useful for anyone else
The "delete file" button is placed well out of the way, to make accidental file deletion a little more difficult
In use, select a pcb file and click "edit" to take you to Autotrax, or click "print" to take you to PFW. It will almost certainly come up with an error message, saying "out of range data" or similar. Just click ok and ignore it- it will create one of the "rubbish" files I mentioned earlier (they're not really rubbish, they can be very important to some users- for me they just clog up the file system, hence the "wash" button).
In PFW, click on "file", then "print", then "final artwork". In the box that appears, click on "show holes", select your printer if you have more than one, then click "output". Select which layer you want to print and "mirror" if you need to flip the layer, then ok the box. Lastly, click "print" and you have a printout at whatever resolution your printer will handle. I use 1200dpi resolution printing on ink-jet transparencies and can do 10 thou tracks at 10 thou spacing with no problems- beats a dos-based printer anytime!!
If you have any Easytrax files that you want to use with Autotrax, open the Easytrax file in a simple text editor. The first line reads "PCB FILE 5"- if you change the 5 to a 4 and save the file, it is now an Autotrax file. It'a very important that it be a simple text editor, it must not change the format of the file when it saves it, or add any extra characters.
Number of visitors to this page so far: